
FLUTTER WEBVIEW TUTORIAL #2 - Convert a website to an app using flutter.
An advanced tutorial on flutter webview

Hello, I'm Samuel, also known as Tech With Sam.
I am passionate about learning and teaching programming, particularly Flutter and Dart at the moment. Please support me by subscribing to my newsletter. Thanks!
Subscribe for weekly tutorials and tips, or DM me to bring your app idea to life.
Questions? Join me on Discord: https://discord.gg/8X7dPYujqm For Business: techwithsam10@gmail.com
Hi 👋, everyone and welcome to part two of the flutter webview tutorial series.
Today, we’re going to learn the second example on how to convert a website into an app in a few minutes using Flutter. If you want to know more about some cogent flutter Tricks and Tips and How to achieve tasks easily in Flutter, consider following me so you don’t miss any updates and subscribing to my YouTube Channel. Thanks
Check the video out for more explanation and part one 👇
Let get started
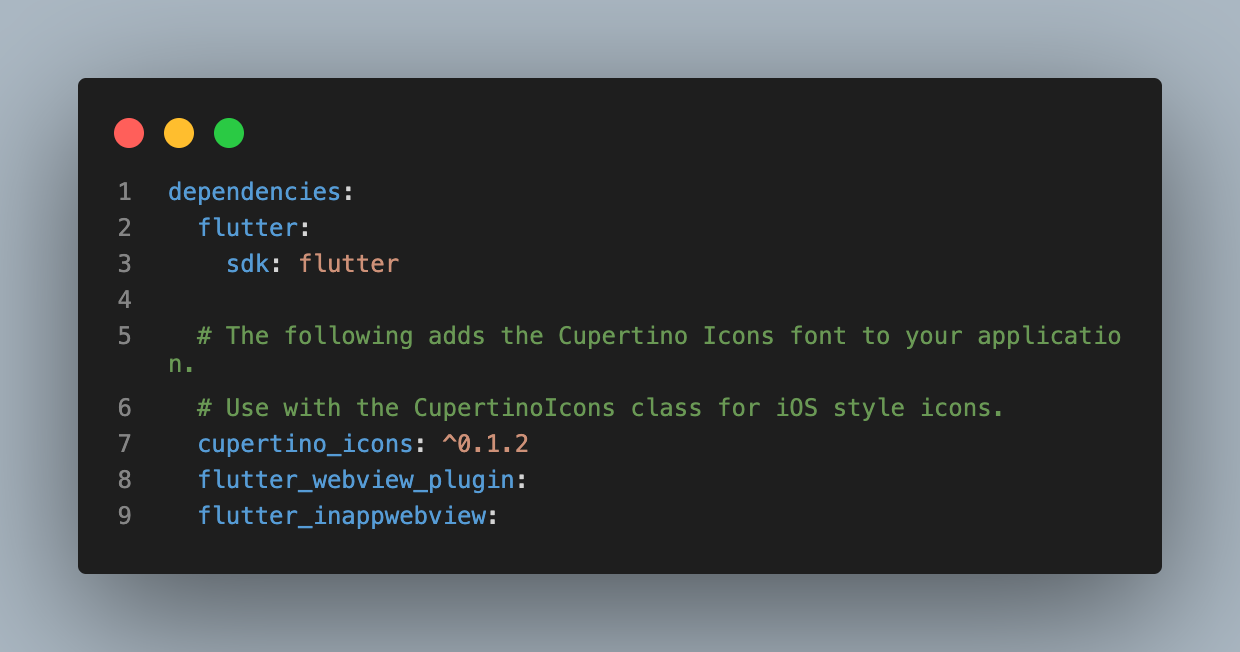
We will make use of the flutter_inappwebview package for this example two. To install this package in your app just paste it in your pubspec.yaml file.
In the webview folder create another dart file for example two, you can name it example2.dart. In the dart file, import the two necessary package 🎁
import 'package:flutter/material.dart';
import 'package:flutter_inappwebview/flutter_inappwebview.dart';
Create a stateful widget and name the class WebExampleTwo or your choice 🤷♂️
class WebExampleTwo extends StatefulWidget {
  WebExampleTwo({Key key}) : super(key: key);

  @override
  _WebExampleTwoState createState() => _WebExampleTwoState();
}

class _WebExampleTwoState extends State<WebExampleTwo> {

  @override
  Widget build(BuildContext context) {
    return Scaffold();
  }
}
We need a controller and double datatype for showing the loading indicator on every page load, so set this under your class State
class _WebExampleTwoState extends State<WebExampleTwo> {
  InAppWebViewController _webViewController;
  double progress = 0;
Body
     body: Container(
        child: Column(
          children: [
            progress < 1.0
                ? LinearProgressIndicator(
                    value: progress,
                    backgroundColor: Colors.white,
                    valueColor:
                        AlwaysStoppedAnimation<Color>(Colors.green[800]),
                  )
                : Center(), // this perform the loading on every page load
            Expanded(
              child: InAppWebView(
                initialUrl: 'https://obounce.net', // your website url
                initialOptions: InAppWebViewGroupOptions(
                  crossPlatform: InAppWebViewOptions(
                    javaScriptEnabled: true,
                    javaScriptCanOpenWindowsAutomatically: true,
                  ),
                ),
                onProgressChanged: (_, load) {
                  setState(() {
                    progress = load / 100;
                  });
                },
                onWebViewCreated: (controller) {
                  _webViewController = controller;
                },
              ),
            )
          ],
        ),
      ),
To create a reload button or icon for a reload action, let's create an icon for that on our appBar
AppBar
      appBar: AppBar(
        title: Text("O'Bounce Technologies"),
        centerTitle: true,
        elevation: 0,
        actions: [
          IconButton(
            onPressed: () {
              if (_webViewController != null) {
                _webViewController.reload();
              }
            },
            icon: Icon(Icons.refresh),
          ),
        ],
      ),
And that's all for the WebExampleTwo page you can now move to the homepage.dart file or any page you want your user to click the button to navigate to the WebExampleTwo page.
              MaterialButton(
                onPressed: () {
                  Navigator.push(context,
                      MaterialPageRoute(builder: (_) => WebExampleTwo()));
                },
                child: Text(
                  'Example 2',
                  style: TextStyle(color: Colors.white),
                ),
                color: Colors.green,
                padding: EdgeInsets.symmetric(horizontal: 70, vertical: 12),
              ),
And that's all the major stuff you need to know 👌, For more explanation kindly check the video tutorial.
Source Code 👇 - Show some ❤️ by starring ⭐ the repo and do follow me 😄!
I hope you have learned one thing or the other, kindly give this article much appreciation you want if you enjoy it, feel free to ask a question and leave a comment if you feel like 🤭. Thanks for reading and see you in the next series.
🔗 Social Media / Let's Connect 🔗 ==> Github | Twitter | Youtube | WhatsApp | LinkedIn | Patreon | Facebook.
Join the Flutter Dev Community 👨💻👨💻 ==> Facebook | Telegram | WhatsApp | Signal.
Subscribe to my Telegram channel | Youtube channel | and also to hashnode newsletter in the input box above 👆👆. Thanks
Happy Fluttering 🥰👨💻


