
FLUTTER WEBVIEW TUTORIAL #1 - Convert a website to an app using flutter.

Hello, I'm Samuel, also known as Tech With Sam.
I am passionate about learning and teaching programming, particularly Flutter and Dart at the moment. Please support me by subscribing to my newsletter. Thanks!
Subscribe for weekly tutorials and tips, or DM me to bring your app idea to life.
Questions? Join me on Discord: https://discord.gg/8X7dPYujqm For Business: techwithsam10@gmail.com
Hi 👋, everyone and welcome to a brand new tutorial series on Flutter.
Today, we’re going to learn how to convert a website into an app in a few minutes using Flutter, which as you may have guessed already from the title! If you want to know more about some cogent flutter Tricks and Tips and How to achieve tasks easily in Flutter, consider following me so you don’t miss any updates and subscribing to my YouTube Channel. Thanks
In this tutorial, we will create the first example of our webview application using flutter, and this is the simplest way to showcase a webpage in our app.
This series will be split into four because we're going to unveil four examples of a webview app we can use in a flutter application.
Kindly check out the PART ONE video on my Youtube channel. Kindly subscribe ✌
I have already written two articles on this same topics before but there are fresh features on the package used
Let's get started
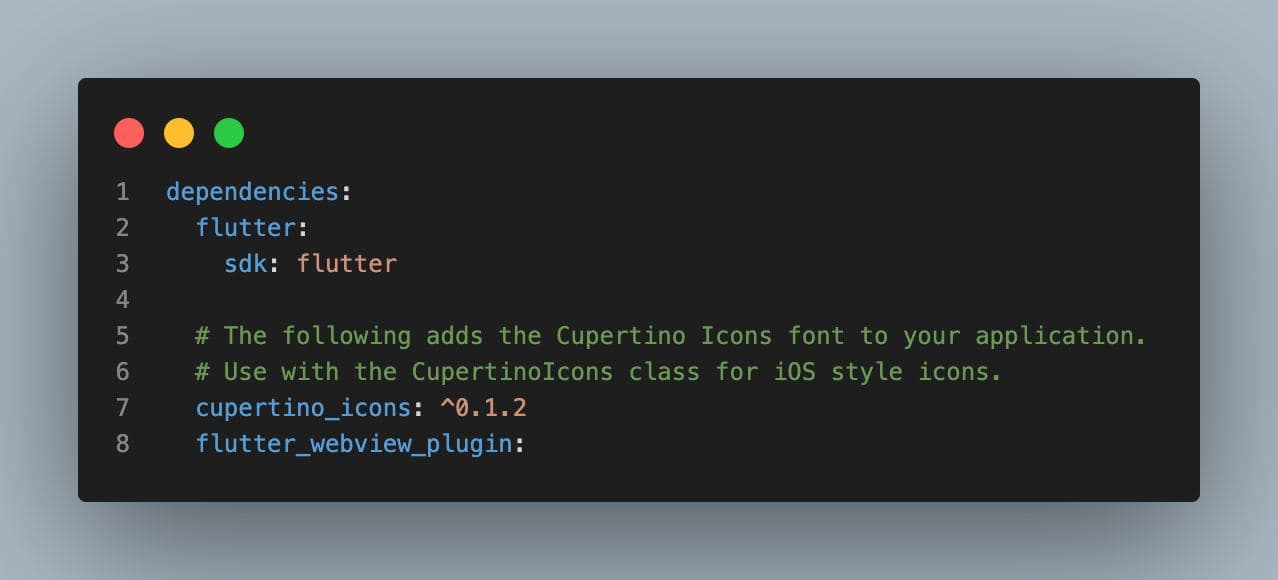
Firstly, we're going to use the flutter_webview_plugin package for PART ONE. Son install this package in your app by pasting it in your pubspec.yaml file.
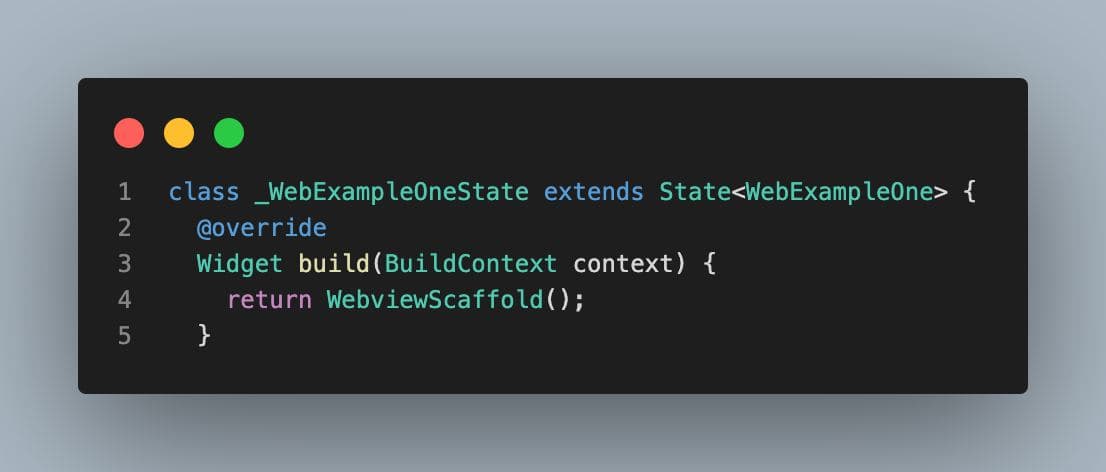
Create a new dart file for the webview page and name it webApp1.dart or so 🤷♂️, after creating the dart file, then inside the file {webApp1.dart} create a StatefulWidget and name the class as you wish, I will name mine ## WebExampleOne 😎.
In the build widget, we're going to return the webview widget called ==> WebviewScaffold instead of returning a normal Scaffold widget 🤢.
But before that, you need to import our material widget and the flutter_webview_plugin widget as well
import 'package:flutter/material.dart';
import 'package:flutter_webview_plugin/flutter_webview_plugin.dart';
And that's all, we can now work on our WebviewScaffold, if you press CTRL + SPACE ==> (Both Windows and Mac) inside the bracket of the WebviewScaffold( ) you will see a list of resources you can make use of while the URL is required,
url: 'https://obounce.net'
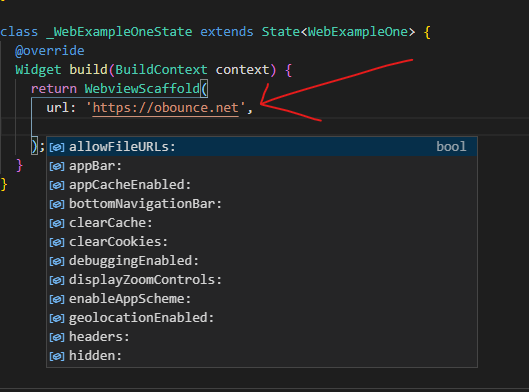
Then, after that you can just explore other useful methods you might need
appBar: AppBar(
        title: Text("O'Bounce Technologies"),
        centerTitle: true,
        elevation: 0,
      ),
      withZoom: true,
      withLocalStorage: true,
      scrollBar: true,
      withJavascript: true,
      initialChild: Center(child: Text('Loading...')),
      bottomNavigationBar: Padding(
        padding: EdgeInsets.all(12),
        child: Text('This is the bottomNavigationBar on a webview page.'),
      ),
      persistentFooterButtons: [
        CircleAvatar(
          backgroundColor: Colors.purple,
          child: Text('btn1'),
        ),
        CircleAvatar(
          backgroundColor: Colors.orange,
          child: Text('btn2'),
        ),
        CircleAvatar(
          backgroundColor: Colors.red,
          child: Text('btn3'),
        ),
        CircleAvatar(
          backgroundColor: Colors.grey[700],
          child: Text('btn4'),
        ),
      ],
And that's all the major stuff we need 👌, You should check out the video for more explanation.
Source Code 👇 - Show some ❤️ by starring ⭐ the repo and do follow me 😄!
I hope you have learned one thing or the other, kindly give this article much appreciation you want if you enjoy it, feel free to ask a question and leave a comment if you feel like 🤭. Thanks for reading and see you in the next series.
🔗 Social Media / Let's Connect 🔗 ==> Github | Twitter | Youtube | WhatsApp | LinkedIn | Patreon | Facebook.
Join the Flutter Dev Community 👨💻👨💻 ==> Facebook | Telegram | WhatsApp | Signal.
Subscribe to my Telegram channel | Youtube channel | and also to hashnode newsletter in the input box above 👆👆. Thanks
Happy Fluttering 🥰👨💻


